221-bam转bigwig的binsize问题,你遇到了吗?
刘小泽写于2020.12.09
0 前言
在ChIP-Seq的分析中,我们常常需要将bam文件转为bigwig,以便后续的可视化及分析。一般使用deeptools的bamCoverage即可快速实现
官网链接:https://deeptools.readthedocs.io/en/develop/content/tools/bamCoverage.html
bamCoverage的作用
将比对的bam转为基因组 coverage track (bigWig or bedGraph)
coverage的计算
the number of reads per bin( where bins are short consecutive counting windows of a defined size)
重要参数
--scaleFactor 1.092883 -bs 10 --normalizeUsing RPGC --effectiveGenomeSize 2685511504 --extendReads 150
scaleFactor就是利用ChIPSeqSpike计算的--binSize, -bs:默认是50,设置的数值越小,窗口越小,整个coverage track的分辨率越高normalizeUsing:几个选项RPKM, CPM, BPM, RPGC, None(默认选择是None)- RPKM = Reads Per Kilobase per Million mapped reads 【计算方法 RPKM (per bin) = number of reads per bin / (number of mapped reads (in millions) * bin length (kb))】
- CPM = Counts Per Million mapped reads, same as CPM in RNA-seq;
- BPM = Bins Per Million mapped reads, same as TPM in RNA-seq;
- RPGC = reads per genomic content (1x normalization); 设置这个选项就需要提供一个effective genome size
effective genome size:有一些默认的数值,可以看https://deeptools.readthedocs.io/en/latest/content/feature/effectiveGenomeSize.html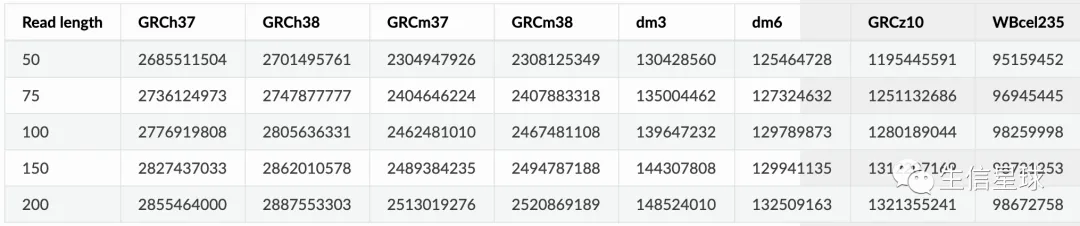
extendReads:默认情况下,read length是不允许延长的,它主要是考虑到一些spliced-read data like RNA-seq;而对于ChIP-seq,本身fragments就是连续比对的,因此可以使用。需要注意:如果reads本身已经超过了这个设定的值,那就不会被延长
最简单的运行方法
bamCoverage -b reads.bam -o coverage.bw

bamCoverage --bam reads.bam -o coverage.bdg -p 10 --outFileFormat bedgraph
其他参数
bamCoverage --bam a.bam -o a.SeqDepthNorm.bw \
    --binSize 10
    --normalizeUsing RPGC
    --effectiveGenomeSize 2685511504
    --ignoreForNormalization chrX
    --extendReads 150
    --scaleFactor 1.092883
对于多个样本
config=~/samples.txt
cat $config |while read i
do
    conf=($i)
  	sample=${conf[0]}
  	# echo $sample

  	bamCoverage --bam align/CHIP_${sample}_rm.mm.bam -o bw/${sample}_scale_rmbl_rpkm.bw \
    --binSize 10 \
    --normalizeUsing RPKM \
    --extendReads 150 \
    --scaleFactor $factor \
    -p 4  \
    -bl mm10.merge.blacklist.bed
done
还可以将bw转为bed
因为后面进行call peaks时,可以使用bam或者bed。这里的bw经过了normalization,因此可以接着使用。通过bigWigToWig(ucsc) + wig2bed (BEDOPS) 工具可以进行转换
# example: H3K27me3-SL_scale_rmbl_rpkm.bigWig
ls *bigWig | while read i;do
	bigWigToWig $i ${i%%_*}.wig
	#  --zero-indexed (-x) option to convert zero-indexed WIG data
	wig2bed -x < ${i%%_*}.wig > ${i%%_*}.bed
done
1 问题来了~
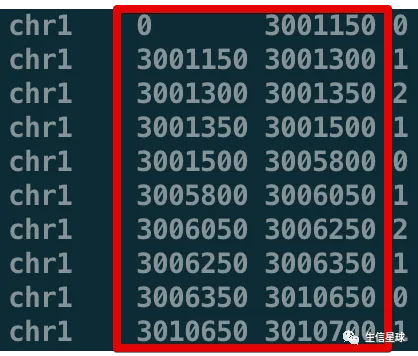
虽然deeptools会将bam转为bw,也支持自定义binSize(“窗口大小”也就是每隔多少碱基计算一次测序深度)和多种标准化计算,但是如果你看看它的结果
下图我其实是定义了binSize为100,但很显然并不是从0-100,100-200这样的
这是因为:
(来自官网)As you can see, each row corresponds to one region. If consecutive bins have the same number of reads overlapping, they will be merged. 即连续的区间都是相同的测序深度,那么它会自动把这些bins合并在一起。作者也说这样做的目的是为了减少bw文件的空间
当然,如果只是进行可视化还好,没什么影响。但是如果后续需要用到bw进一步计算(后面的推送会提到应用场景),就会报错,说两个bw的坐标是不同的,无法继续进行计算

2 怎么办呢?
还是想利用bamCoverage,毕竟使用简单,只是查看了它的全部参数,也没有发现有用的信息
然后看到之前也有人提到了这个问题:https://github.com/deeptools/deepTools/issues/907,并且作者Devon也给出了一个解决方案:

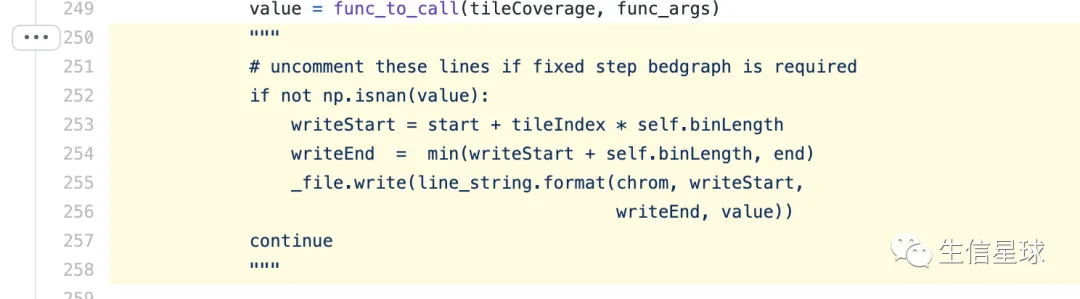
https://github.com/deeptools/deepTools/blob/develop/deeptools/writeBedGraph.py#L250-L258
打开一看,其实就是让我们把这段代码的注释去掉即可
3 尝试解决~
我之前是利用conda安装的,因此如何才能找到这个writeBedGraph.py 文件呢?
find ./ -name "writeBedGraph.py"
# /home/miniconda3/envs/epi/lib/python3.6/site-packages/deeptools/writeBedGraph.py
然后使用vim编辑它,小提示:
# 设置vim显示行号
vi ~/.vimrc
# 然后在里面编辑
:set number
# 保存退出
找到第250行和258行代码,将python的注释"""" 去掉,保存退出
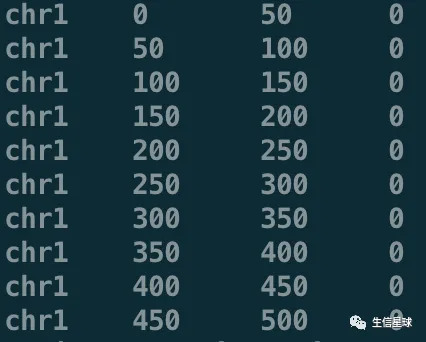
之后重新运行
bamCoverage --bam reads.bam -o coverage2.bdg -p 10 --outFileFormat bedgraph
至此,我们转换bw时又多了一个选择