260-ChIP-Seq带有spike-in的处理流程
刘小泽写于2023.8.21 我在2020年就写过 ChIP-Seq数据中包含了spike-in怎么分析 ,当时还是自己摸索的方法。现在看到有发表的protocol,和你分享
1. 什么是spike-in以及为何要用到它?
什么是spike-in?
spike-in就是在提取的 DNA 或 RNA 样品中加入等量的非目标生物的基因组,但其 GC 含量与目标生物的 GC 含量类似。掺入spike-in的 DNA 片段的长度一般与文库构建前的 DNA 片段大致相同。spike-in应用很广泛,尤其是可能引起整个基因组大部分区域发生改变的实验,例如组蛋白修饰或者转录因子的敲减、激活等(人的H3K27me3建库样本中加入果蝇的基因组)。
为何使用?
NGS对多个实验条件下的数据测序分析都是**基于一个假设:样本在不同条件下的每个细胞的基因组或转录组总量相同。**但这个假设明显很难成立,因为测序过程中各种各样的因素都会产生影响,俗称“批次效应”,比如上样量是否完全一致,PCR 扩增数是否相同等等。我们常规分析过程中针对这种情况,一般都是基于软件算法层面,比如z-score、DEseq2 的 VST标准化、Seurat的Log Normalize归一化等。但这一切都是基于这个“不切实际的”假设,所以为了更加真实体现生物学层面的差异,ERCC(External RNA Controls Consorti) 组织才提出了这个方案。
2 怎么分析?
文章是:2021年发的Protocol to apply spike-in ChIP-seq to capture massive histone acetylation in human cells(10.1016/j.xpro.2021.100681)
文章前面涉及到了如何在实验过程中加上spike-in,感兴趣的朋友可以看看,我们接下来主要还是看分析过程(人+果蝇的spike-in)。
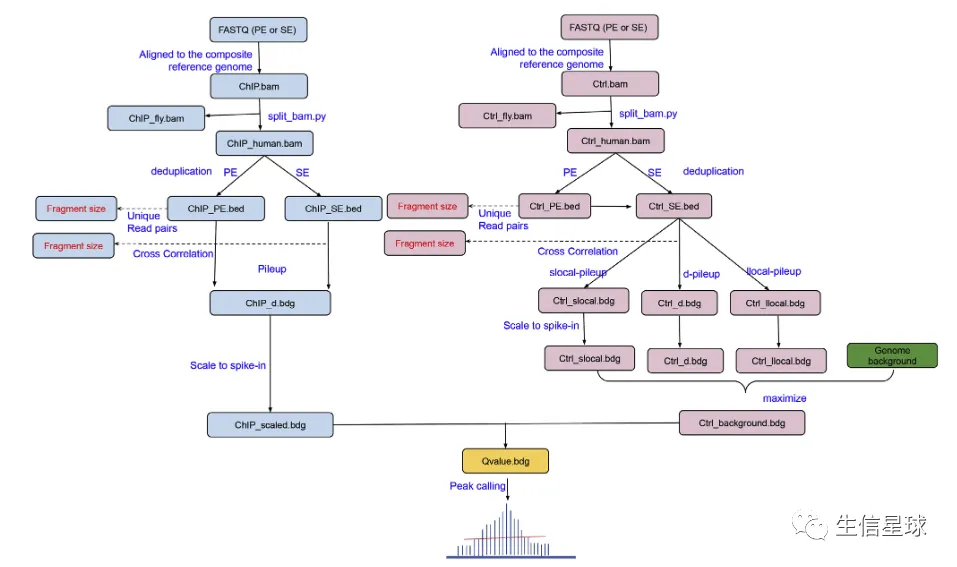
预处理和比对
质控不多介绍,使用fastqc或者fastp都可以。然后就是比对环节,和以往不同的是,这个参考基因组要整合人和果蝇的基因组
# 1. 下载并解压基因组
$ wget http://hgdownload.soe.ucsc.edu/goldenPath/hg38/bigZips/hg38.fa.gz

$ wget http://hgdownload.soe.ucsc.edu/goldenPath/dm6/bigZips/dm6.fa.gz

$ gunzip hg38.fa.gz

$ gunzip dm6.fa.gz

# 2. 将果蝇的chr命名更改,防止和人的混淆

$ sed 's/chr/dm6_chr/g' dm6.fa > dm6_renameID.fa

# 3. 整合fa文件

$ cat hg38.fa dm6_renameID.fa > hg38_dm6.fa

# 4. 构建索引:bowtie2-build"

# "hg38_dm6" is the prefix of index files, which is needed in the next step.

$ bowtie2-build hg38_dm6.fa hg38_dm6

# 5: bowtie2比对到hg38_dm6.fa
# For paired-end reads

$ bowtie2 --threads 4 -x GRCh38_dm6 -1 read_1.fastq.gz -2 read_2. fastq.gz | samtools view -Sbh - > output.bam

# For single-end reads

$ bowtie2 --threads 4 -x GRCh38_dm6 -U read.fastq.gz | samtools view -Sbh - > output.bam

# sort the BAM file using samtools

$ samtools sort -@ 4 output.bam > output.sorted.bam

# index the BAM file using samtools

$ samtools index -@ 4 output.sorted.bam

# 如果有其他样本,可以用👆的流程写个循环
比对结果的理解
比对后,会出现这么几种情况:
- “Human reads”: 只比对到人基因组的reads,这部分就是用来call peaks的
- “Drosophila reads”: 只比对到果蝇的reads,这部分用来计算scaling factor
- “Both”: 二者都比对上的,丢掉
- “Neither (or unmapped)”: 都没比对上的+低质量的reads【mapping quality (MAPQ) < 30 】
现在还新开发了一个专门的工具:spiker(https://spiker.readthedocs.io/en/latest/index.html),可以用split_bam.py来拆分这几种bam文件
计算scaling factor
比如我们拿到的“Drosophila reads”有800,000 reads,而我们想scale到1M(具体的数值设置在👇还会讨论),就可以计算scaling factor :1000000/800000 = 1.25
然后有了这个factor,再乘以原来human的reads数,就是scale之后的结果了
call peaks
spiker也做了一个call peaks的功能,使用Spiker.py即可
# 使用SE fq数据
$ spiker.py --t1 H3K27ac.fastq.gz --c1 control.fastq.gz --bt2-index /data/GRCh38 --spikeIn --csf 1.23 --tsf 0.95 -o H3K27ac
$ spiker.py --broad --t1 H3K27ac.fastq.gz --c1 control.fastq.gz --bt2-index /data/GRCh38 --spikeIn --csf 1.23 --tsf 0.95 -o H3K27ac

# 使用PE fq数据
$ spiker.py --t1 H3K27ac_R1.fastq.gz --t2 H3K27ac_R2.fastq.gz --c1 control_R1.fastq.gz --c2 control_R2.fastq.gz --bt2-index /data/GRCh38 --spikeIn --csf 1.23 --tsf 0.95 -o H3K27ac
$ spiker.py --broad --t1 H3K27ac_R1.fastq.gz --t2 H3K27ac_R2.fastq.gz --c1 control_R1.fastq.gz --c2 control_R2.fastq.gz --bt2-index /data/GRCh38 --spikeIn --csf 1.23 --tsf 0.95 -o H3K27ac

# 使用bam
$ spiker.py -t H3K27ac.sorted.bam -c control.sorted.bam --spikeIn --csf 1.23 --tsf 0.95 -o H3K27ac
$ spiker.py --broad -t H3K27ac.sorted.bam -c control.sorted.bam --spikeIn --csf 1.23 --tsf 0.95 -o H3K27ac
# 参数说明
--tsf=TREAT_SF
Scaling factor for treatment. This will be applied to the pileup bedgraph file of treatment (*.treat.pileup.bdg).

--csf=CONTROL_SF
Scaling factor for control. This will be applied to the pileup bedgraph file of maximum background (*.control.pileup.max.bdg).
3 看一个spike-in处理前后的对比
作者做的实验是想说明:SAHA处理后H3K27-ac的修饰功能会增强
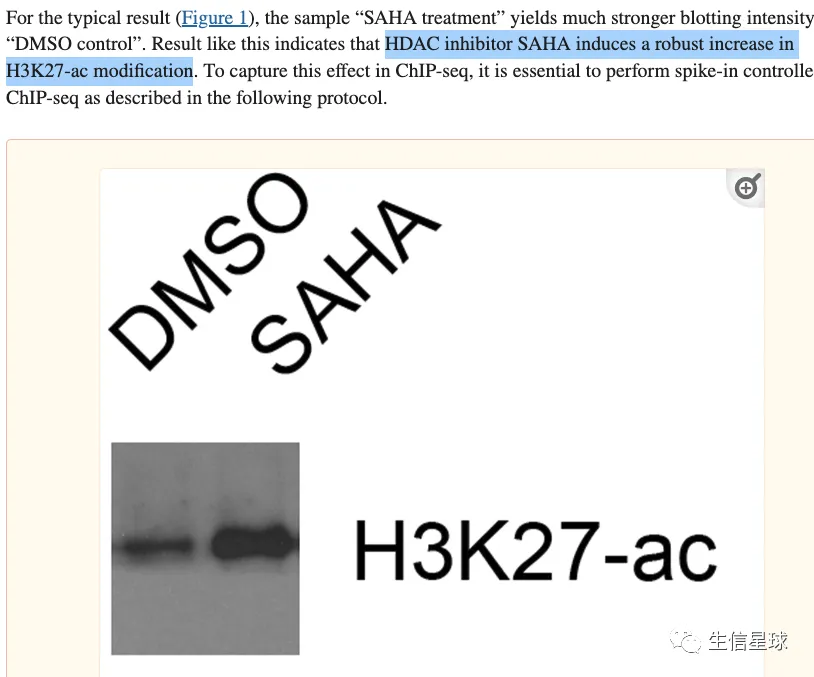
在数据层面,就应该对应H3K27-ac的信号值增多。但是图B没有使用spike-in,可以看到处理前后没什么变化。而图C使用了spike-in,并且计算了外源的scaling factor,然后将human的reads乘以这个factor,才作为信号值体现在图上(也就是76*0.20, 73*0.22, 88*0.8, 94*0.76)

4 如何取值scaling factor
这个不是一成不变的,而是要根据具体的实验情况确定,主要有以下几种情况:
4.1 Normalize to the minimum (downsampling)

Advantages: downsampling can be performed at BAM files. After downsampling, the analyses can be handled the same as regular ChIP-seq data.
Disadvantages: discard many reads and decrease statistical power of peak calling. This approach is applicable to a dataset where the numbers of reads are similar.
4.2 Normalize to the median

Advantages: Half of the samples are scaled up and half of the samples are scaled-down, signals after normalization may not off the scale too much.
Disadvantages: not suitable for integration analysis, as different datasets would have different median values.
4.3 Normalize to a common value (such as 1 million)
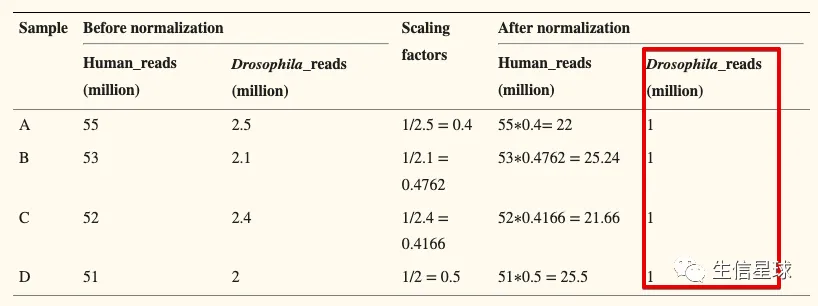
- Advantage: good for integration and visualization of multiple, heterogeneous datasets.
- Disadvantages: some datasets might be disproportionately scaled up or down.
附:练手数据
spiker提供了一套带有spike-in的数据可供练手:https://spiker.readthedocs.io/en/latest/walkthrough.html
| Sample (ChIP) | SRR_accession | Sample (WCE) | SRR_accession |
|---|---|---|---|
| Jurkat_K79_0%_R1 | SRR1536557 | Jurkat_WCE_0%_R1 | SRR1584489 |
| Jurkat_K79_25%_R1 | SRR1536558 | Jurkat_WCE_25%_R1 | SRR1584490 |
| Jurkat_K79_50%_R1 | SRR1536559 | Jurkat_WCE_50%_R1 | SRR1584491 |
| Jurkat_K79_75%_R1 | SRR1536560 | Jurkat_WCE_75%_R1 | SRR1584492 |
| Jurkat_K79_100%_R1 | SRR1536561 | Jurkat_WCE_100%_R1 | SRR1584493 |